Troubleshooting
While the company’s reputation is amongst some of the best in the category when it comes to outdoor hardware tools and equipment, it should be expected that continuous exposure to the harsh environmental elements such as heat, dust, grime and physical elements such as stones and roots and eventually cause minor niggles with your weed eater. However, these are issues that can generally be quickly rectified in your own garage, without having to consult a service technician. It’s important to ensure that you’re comfortable operating power tools and taking them apart, however. If this is something that you’re fairly new to or not very comfortable doing, do not hesitate to visit a service centre to get the unit fixed up.
Nothing gets more importance than safety!
It’s critical that you observe all the necessary safety protocol and prioritise your safety and the safety of others when it comes to attending to your power tool. Ensure that you go through all the necessary safety information before you attempt any repairs.
– Scan the area before you begin to use the weed eater over the patch, ensure that you remove any large stones or other similar obstacles.
– Ensure that there are no children, pets or people in the area when you happen to be utilizing the power tool.
– It’s critical that you operate the trimmer in adequate lighting conditions. It is advisable to use the trimmer in daylight, however if trimming at night, ensure that there is adequate lighting for the proper operation of the weed eater.
– Do not permit young children or inexperienced adults to operate the weed eater.
– Ensure that you go through the instruction manual provided with the unit and thoroughly familiarize yourself with all the related terms before you operate the trimmer for the first time.
– Always wear appropriate clothing when using the trimmer. Never attempt to operate the machine with long loose-fitting clothing.
– Never attempt to stop the unit by bringing your body parts in front of the machine’s moving parts.
– Service the machine regularly as per the instructions in the provided schedule to ensure the optimal lifespan of the motor and other components.
– Use only genuine parts when replacing any of the weed eater’s parts.
– When feeding spool through the unit, use only the recommended size and dimensions.
– Do not attempt to feed too much trimmer line through the unit’s eyelet as this can slow down operation and reduce performance.
– Ensure that the guard is always installed and secure before you use the unit.
– Never attempt to operate the weed eater when climbing on objects such as ladders or stairs.
– Always use both your hands to hold and operate the weed eater.
– Ensure that you wear the necessary hearing and eye protection when operating the weed eater.
Identifying the various parts of the trimmer
Before you begin to utilize the weed eater, it’s absolutely critical that you verify and learn all the parts of the trimmer so that you do not run into any difficulties while making use of the unit. Ensure that you have a basic understanding of the product so you can improve your cutting efficiency as well as deal with any potential issues immediately without having to refer to the manual.
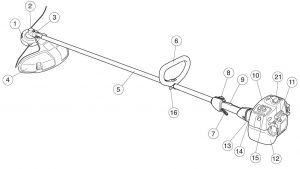
1. Main trimmer head unit: This is the component that houses the rotating line that will do most of the cutting while you handle the trimmer
2. Grease and lubrication cap head: This component protects the sump where lubrication is done
3. Primary gear for bevel: The gearing for the main bevel
4. Guard with attachment for cutting: The primary guard that prevents the cutting parts from coming in contact with the operator
5. Primary shaft component: The holding shaft unit components that enable changing the control length.
6. Looping handle: The handle around which the main trimming line is housed.
7. Throttle controller handle: The primary handle for controlling the throttle input and adjusting throttle delivery
8. Main stopping mechanism switch: The primary kill-switch for stopping the main unit
9. Lock for throttle: The locking mechanism switch for freezing the setting of the throttle control
10. Cylinder head covering: The protective covering the encapsulates the cylinder
11. Starting handle: The main starting handle switch to engage the motor and start the unit
12. Fuel tank: The main fuselage with which the unit’s powering gasoline is housed and stored
13. Choke controller: The component that enables the operator to manipulate the choke settings of the unit and increase or decrease the amount of air fuel mixture taking place within the combustion chamber of the unit.
14. Purge for air: Allows the unit to access an air fluid flush to recirculate
15. Air filter covering: The primary flap covering that protects the air filter from the dust and debris and other contaminants in the atmosphere than can enter the combustion chamber
16. Handle height adjustment system: The main height adjustment system that allows the operator to find the optimal operational position with the unit.
17. Main drive disc: The primary driver disc component
Husqvarna Weed Eater troubleshooting
Husqvarna weed eaters have a reputation of very reliable and hardly breaking machines. We have put together a table showing ypical and most commonly occurring faults with its solutions
Table 1. Most common troubleshooting applicable for all Husqvarna trimmers
| Issue | Possible problem | Possible solution |
| Starting trouble with trimmer | Air filter might be choked with debris and need to be cleared out | Clean out the air filter and replace it with a new element if necessary |
| Fuel might be of poor quality or have gone stale | Check the fuel quality and pour fresh gasoline if required. | |
| Spark plugs may need to be reset or replaced | Check the condition of the unit’s spark plugs and correct the spark gap if possible – otherwise replace with new plugs. | |
| Throttle lock may not have been released | Ensure that the throttle lock is released before attempting to start. | |
| Trimmer shutting down when mowing | Fuel can may be clogged up | Check that the vent at the back of the fuel cap has not been clogged by dirt. |
| Air filter might be choked with debris and need to be cleared out | Clean out the air filter and replace it with a new element if necessary | |
| Swath length could be longer than necessary | Decrease the length of the swath to the recommended mark and ensure that it is not longer than necessary. | |
| Carburetor might need to be readjusted | Check the air fuel mixture ratio and reset the carburetor to the appropriate setting in order to facilitate operation. | |
| Motor operating too slowly for trimmer | Air filter might be choked with debris and need to be cleared out | Clean out the air filter and replace it with a new element if necessary |
| Fuel might be of poor quality or have gone stale | Check the fuel quality and pour fresh gasoline if required. | |
| Spark plugs may need to be reset or replaced | Check the condition of the unit’s spark plugs and correct the spark gap if possible – otherwise replace with new plugs. | |
| Swath length could be longer than necessary | Decrease the length of the swath to the recommended mark and ensure that it is not longer than necessary. | |
| Excess vibration from the unit | Nylong cutting line has not been wound properly | Ensure that the spool has been wound properly around both the edges of the unit and that the spool is in good condition – replace the spool if necessary |
| Swath length could be longer than necessary | Decrease the length of the swath to the recommended mark and ensure that it is not longer than necessary. |
Starting, stopping and adjusting throttle
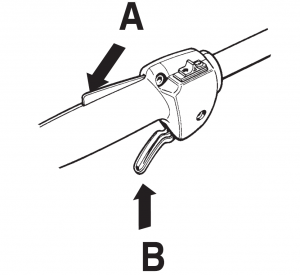
The unit’s throttle lock can be used for preventing the accidental operation or manipulation of the main throttle control setting. By engaging the main lock switch A, you will enable the release of the throttle control handle and this allows you to switch the main throttle speed and change its position. After you have set the desired position, you can set the handle (B) back to the locked position by pulling back the lock switch to effectively freeze the throttle setting.
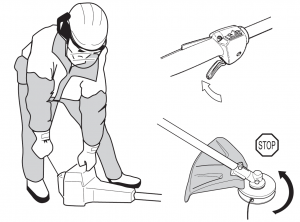
Similarly, you can utilize the stop switch to turn the engine completely off – to start the engine, set the appropriate throttle setting and then pull the throttle handle sharply. Ensure that you release the handle gradually after you have brought the unit to a start. Aim to always start the weed eater from an almost horizontal position in order to enable quicker starting. Before you start the unit, ensure that the primary supporting flange has not been compromised due to repeated use. Also make sure that the machine is on the ground in a clear patch, away from obstacles such as stones, twigs and other artifacts. If you’re having difficulty starting the unit, use the air purge to keep pumping the unit with fresh air in order to optimize air fuel mixture. Practice extreme caution when starting in order to prevent any injury, ensure that no part of your body is near the spinning line.
Operational guide and trimming techniques
Hold the unit with both hands with a firm grip and begin to trim by gradually working your way across the lawn area in slow deliberate steps. Do not move too fast in order to get a well-defined and efficient cutting experience. Ensure that you hold the main unit below the waist height level. It’s crucial that you do not allow the trimmer unit’s head to touch the ground as this can hamper the main motor and degrade its performance. It’s also extremely hazardous to try to remove any cut material from the machine when the unit is powered on. Allow the engine to always slow down to a basic idle speed after each trimming session.
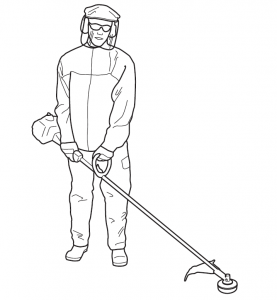
Ensure that you hold the trimmer head at an angle while using the unit to cut through the lawn. Ensure that the angle is not too steep as this can hinder optimal performance of the weed eater and compromise your gardening efficiency. Pressing the cord into the garden lawn can not only degrade performance and slow down the motor, it can severely damage the unit and require expensive repairs to rectify. Grass, weeds and other vegetation can easily be sliced off by the weed eater without much effort however blunt objects and stumps can damage the line – hence, a prior inspection is important.
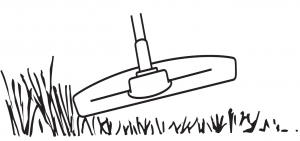
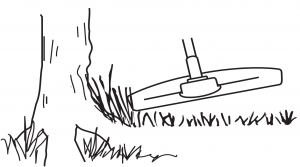
However, the nylon line is significantly strong enough to cause considerable damage to property and even sensitive tree barks or even fencing – hence be careful and mindful of your surroundings when operating the unit. It’s recommended that you maintain a cord length of anywhere between 10-12 cm in order to get the most from your trimmer. You can also employ the clearing technique in order to get a good well-rounded cut in places with a higher density of unwanted vegetation, such as closer to the barks of trees. While holding the trimming head well above the ground and gradually tilt it until the cord begins to slash at the ground just beneath and around the bark, where the vegetation is thicker.
The most popular employed method is the regular cutting streak, where the trimming head is held parallel to the ground with the string trimming equal vegetation on both sides. This method is ideal for cutting lawns that cannot be easily trimmed with a conventional mower.
Remember however, that constantly allowing the cord to come in contact with the ground can result in increased wear and tear to the unit.
Husqvarna Weed Eater maintenance work schedule
| Maintenance interval | Action |
| Daily | Check and secure the guard |
| Clear out any accumulated debris from motor | |
| Clean the primary trimmer head | |
| Weekly | Check the fuel quality and replace stale fuel |
| Check nylon string length | |
| Check guard stability and main screws on housing | |
| Inspect the shaft | |
| Every 90 days | Inspect the four guard screw bearings |
| Inspect the motor fastenings | |
| Every 6 months | Check the fuel quality and replace stale fuel |
| Inspect the motor fastenings | |
| Check guard stability and main screws on housing | |
| Annual | Inspect the four guard screw bearings |
| Inspect the spool and replace if necessary |